Associated Wikis
(privileges may be required)
Sidebar
chara:night_time_pop_changes
This is an old revision of the document!
Night-time POP Changes
Instructions for Changing PoPs During the Night
This page has been updated JAN 2020 to reflect the use of the new obsgtks and POPPERIGTK for pop changes.
(The old version can be found by logging into the wiki and selecting the old revisions icon on the right.)
It is proper protocol for the PI's, remote or visiting scientists to announce any PoP changes 10 minutes before needed so the operator can bring up the required windows. Please give the PoP's for only the telescopes that need changing. Use this format: E1 → 1, E2 → 2, W1 → 5, etc. Give the desired PoP only.
- Unlock Tiptilt on all beams using the Tiptilt Servo GUI.
- If the telescopes are still pointing at a star, make sure to periodically check the AZ/EL status on the telescope servers during the POP change procedure. If the telescopes ever get too low or start drifting, click [STOW] to safely stow the telescopes until after the POP change finishes.
- Make sure that the cart involved is further back than 2 meters. Do not do a PoP change with a cart on the front switch.
- Close the M5 cover on each telescope that needs a POP change using Control Tab.
- Go to the M10 camera with the M10AL button on the CONTROL tab and the ON button at the top of the obsgtk
- Open the POPs GUI. Click [Overview] to bring up the overview to see the status of which POPs are in.
- When reading the overview, the light starts from the top and goes down. The light will reflect off the first POP that is in.
- “–” means the POP mirror is in place, “|” means the POP mirror is out, “N” means the POP mirror is moving or has not hit the limit switch.
- If the POP overview reports nonsense, then click “FLUSH” on the PoPS GUI, followed by “REOPEN” on the PoPS GUI, and finally, “UPDATE” on the POP Overview. The overview should now report the correct PoPs.
- Send VisBeams to the correct pair of telescopes that you need to adjust.
- Open the “B1” through “B6” shutters on the SHUTTERS GUI for the telescopes that you need to adjust. Also open the [LASER] shutter on the SHUTTERS GUI. Make sure the VEGAPERI is up or the laser will not go to the telescopes.
- Turn the Laser Filter to “ND 0.0”.
- Check to make sure the counts are not saturating on the TT server (<200,000). Turn the exposure to 1 ms if it is too bright.
- You should now see the laser appear on the “M10AL” TV screen for the telescopes. There is a small spot near the center of the M5 cover that is used as a reference for aligning the laser beam. If the laser beam doesn't have a well-defined bright or dark spot in the center, you can adjust the focus by opening the “IRIS” gui and clicking [DEC] or [INC] to change the IRIS setting. If you need to, you can click [BEAM] on the IRIS gui; this will close the IRIS and then re-open it to a pre-defined “Beam” position.
- Open the POPPERIGTK from the icon on the upper left screen. Turn on the power to the telescope you want to change the PoP on.
- Click the PoP you want and both the PoP mirror and periscope will move to make the change.
- During the process above, the laser beam will have disappeared from the “M10AL” screen. Once the PoP change is complete, a pop up window with the PICO 2 adjustment for the M10 mirror will appear. A message will also state the PoP change is complete.
- After each telescope is complete to this point, turn OFF the power and move to the next telescope. Only one can be going at a time.
- You will need to finish the alignment by adjusting the M10 mirror.
- Make sure the POPPERIGTK powers are off to each scope when finished as the spot can move slightly when it is turned off.
- Click UP/DOWN/LEFT/RIGHT to center the laser beam on the M10AL spot. Some guis will require increasing the step size to move the spot at a reasonable rate, often 300-500. Many spots will zig-zag as they move, but will continue in the right direction. After you finish, click [OK] on the PICO alignment gui to close the window.
- Close the shutter for that telescope beam using the SHUTTERS GUI.
- Open the M5 cover for the telescope. Click ACQ to get back to the ACQ view.
- Repeat the above procedure for each telescope that needs a POP change.
- After you finish, make sure you change the laser filter back to “ND 3.0”. Close the “Laser” shutter on the SHUTTERS GUI. Also make sure that the M5 covers are open on all telescopes or the telescopes will not lock on the stars.
- Check the POP Overview to make sure all the POPs are correct. Go to Configuration Tab on Cosmic Debris and click “GET” to get the new configuration. Make sure the POPs update correctly. If the POPs and the ref cart are correct, then click “SEND” to send the new configuration to OPLE and the other servers. You can also check to make sure the configuration is correct on the OPLE GUI Configuration Tab.
- If you are staying on the same star, go the OPLE GUI and click the [STOP] button at the bottom of the Control Tab. Then click [START] at the bottom of the same tab to restart astrolib in order to send carts to the correct positions for the updated POPs.
Updated 10-22-2016
Troubleshooting
1. A pop mirror does not move IN or OUT
When a pop mirror does not move IN or OUT when clicking on the gui, the most likely cause is a timeout which can be reset. Otherwise, the fix is to change a blown fuse at the pop mirror. Below is the procedure on how to fix a timeout and change a blown fuse.
Tools needed:
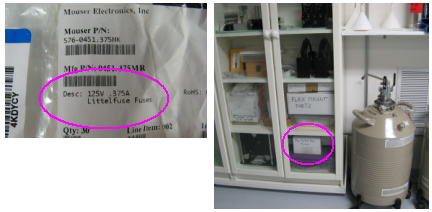
Philips screwdriver, A small Allen key, Meter to measure resistance, Tweezers, Replacement fuse (see below at step 1. 4.)
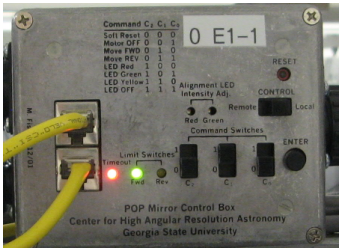
- 2. Slide the CONTROL switch on the box to “Local”. The red “Timeout” led will most likely turn ON and may be one of the green ones (Fwd or Rev limit) indicating the current position of the pop.
 (Fig. POP-trouble 2) Try to use the RESET button: push it with a small enough Allen key. Slide the command switches according to the chart on the box to command the mirror to the other position. Wait about a minute. If the other green led will come on indicating that the mirror moved, then you are done. It was a simple timeout. Otherwise take the next step.
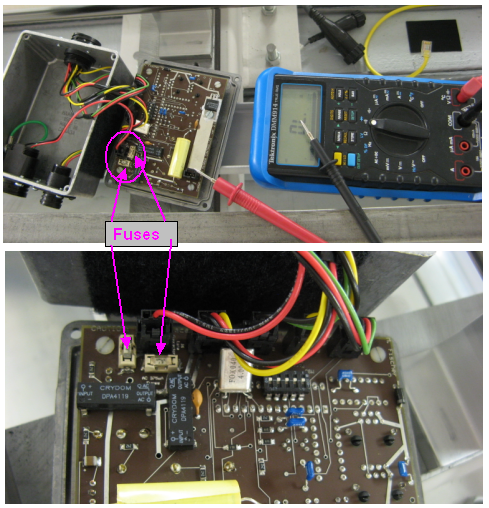
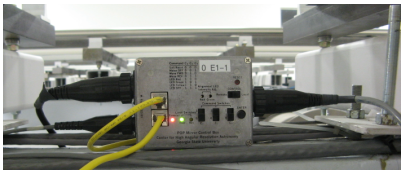
- 3. Disconnect all the cables; take the box off the velcro and to a convenient place. Unscrew the four Philips screws at the corners and slowly take off the lid. Do not disconnect the wires inside the box. On the backside of the lid you will see two fuses. Set the meter to continuity mode, which makes a beep when there is continuity, and check the contact between the two ends of each fuse. ( Fig. POP-trouble 3-4 )
A beeping fuse is good. You have to replace the fuse if the meter does not beep. It could be that both of them were blown.
- 5. Use tweezers to take out the blown fuse from its holder, and insert a new one. Put the lid back; be mindful of the right orientation with respect to the connectors. (Look at the first picture.) Secure the lid with the screws, and attach the all the connectors.
- 6. Test the box in “Local” mode. Slide the command switches to FWD: 0 1 0 or REV: 0 1 1 to get the mirror moving and hit the Enter button. Wait until the green limit switch led lights up. When the mirror goes against the hard stops, a clinking sound can be heard from the pop box.
- 7. If the mirror still does not move as expected further investigation is needed, and probably the pop box has to be opened after letting air into the pipe. If the mirror moved as expected go to the next step.
- 8. Slide the CONTROL switch to “Remote”. Make sure you did not leave anything on the rail.
chara/night_time_pop_changes.1579660242.txt.gz · Last modified: 2020/01/21 21:30 by charaobs
Except where otherwise noted, content on this wiki is licensed under the following license: CC Attribution-Share Alike 4.0 International


