
This page includes instructions for how to plan CHARA observations using ASPRO2 and chara_plan2.
How to Plan CHARA Observations using ASPRO 2
ASPRO2 is a Java based program developed and maintained by JMMC that allows users to plan interferometric observations. ASPRO2 can be run through the web server at the JMMC website. Alternatively, the current Aspro2.jar file can be downloaded directly from the JMMC site. See the Aspro 2 User Manual available at JMMC for detailed instructions on how to use the software. The instructions below give a basic overview of how to set up ASPRO2 for CHARA observations.
Start Aspro2 by using the JMMC link for the web interface or by typing "java -jar Aspro2-0.9.9.2.jar" into a terminal window (use most recent version).
Load Targets by entering star names into Targets field.
Targets can be flagged as calibrators by clicking on the Editor button and using the "Flag calibrator" button.
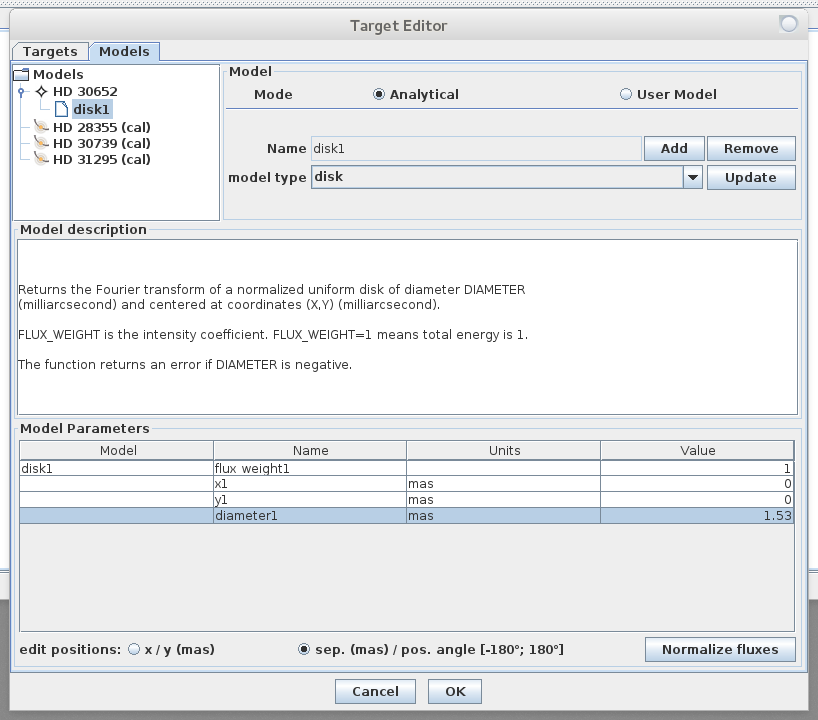
The geometry of the target can be defined by clicking on the Editor button, going to the Models tab, and adding a model type (e.g., a uniform disk with a specified angular diameter).
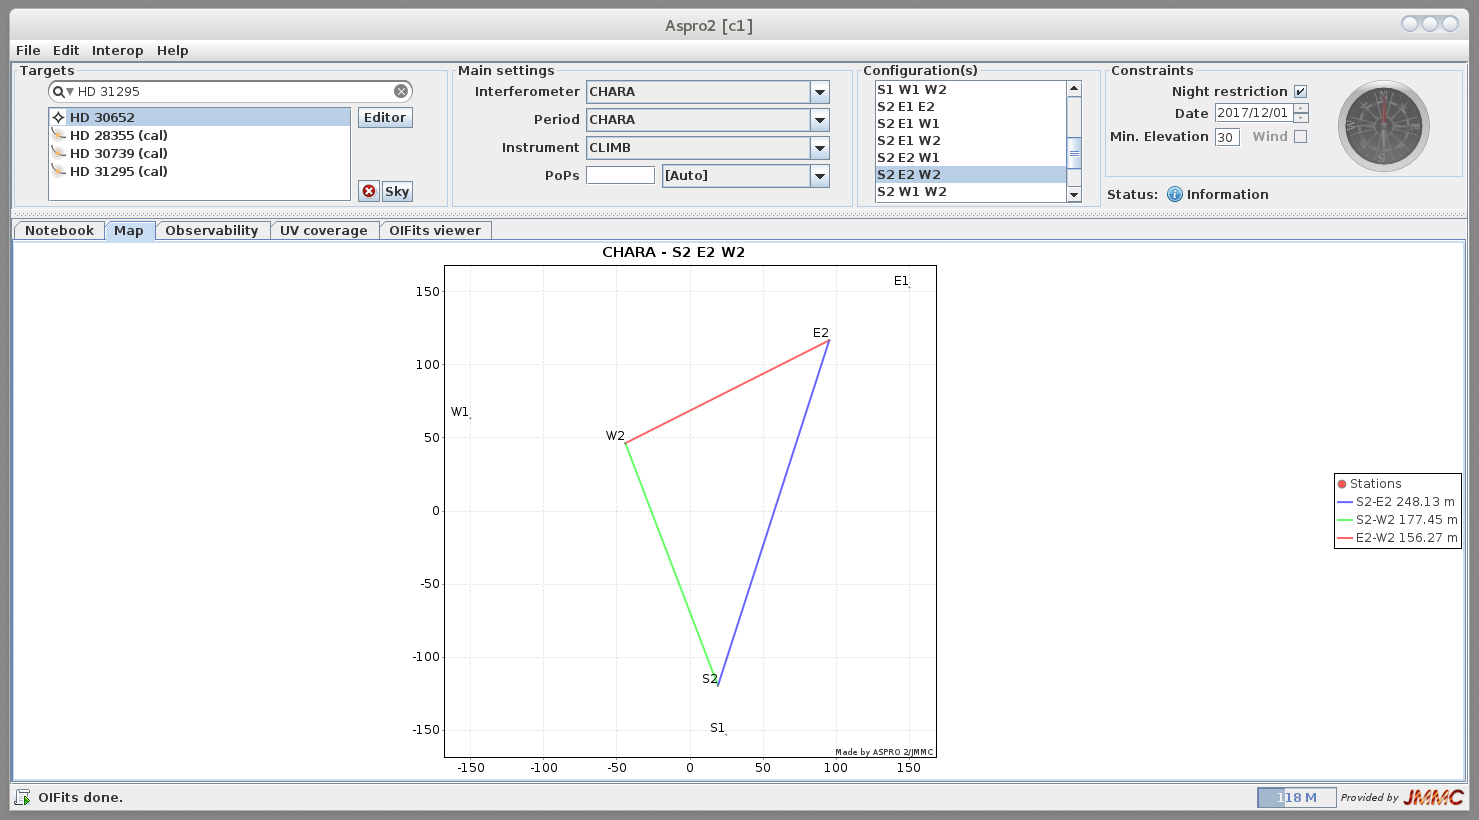
On the main page, in the Main Settings fields:
- Select CHARA as the Interferometer.
- Select appropriate beam combiner (CLASSIC/CLIMB/MIRC_6T, etc).
- Select baseline configuration in the Configuration box (e.g., S2-E2-W2 in the example below).
- Select the observing date and set the minimum elevation to observe a target (elevations above 30-40 deg are recommended).

If you leave the POPs with [Auto] selected and go to the Observability tab, POPs will be selected automatically to maximize the delay coverage while the target is near transit. In the example above S2-POP2, E2-POP1, W2-POP5 give an observable window from UT 05:35 - 11:31 for HD 30652 when all three carts are in delay on 2017 Dec 01. Note: CHARA typically uses Universal Time while observing. To be consistent with this convention, select "U.T.C" from the time selection box at the bottom of the Observability window.
Changing the POPs will change the available delay window. For example, changing to S2-POP4, E2-POP3, W2-POP5 will shift the delay window earlier in the night between UT 04:08 to 08:33:

NOTE: When you load a target, some of the possible POP combinations will disappear from the pull-down menu. The software selects POP combinations that work best for the targets that you load. If you have targets that are at different declinations and cannot be observed with the same POP configuration, then you might want to load them into ASPRO2 separately, or enter alternative POP combinations directly into the input window (rather than relying on the selection menu).
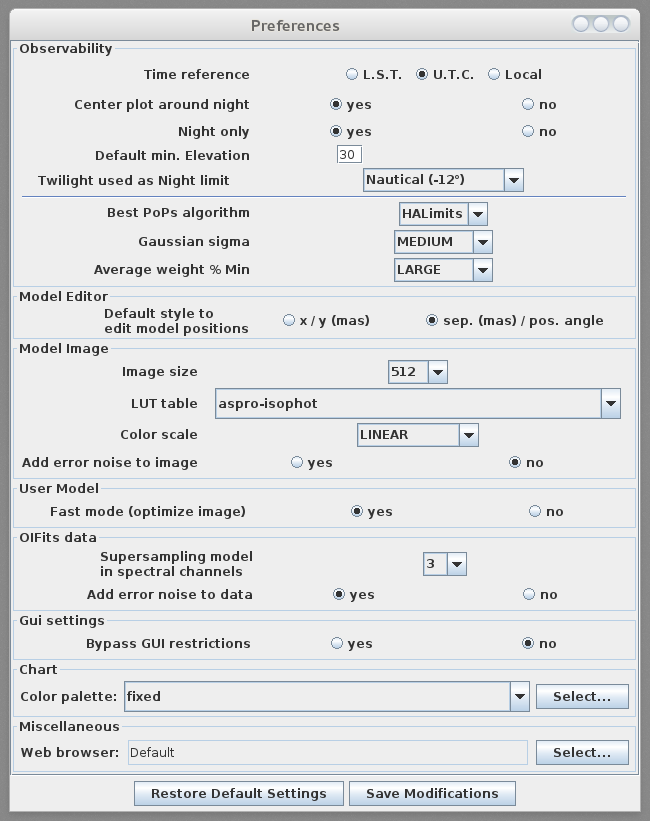
NOTE: ASPRO2 uses 18 degree twilight as the default limits for the beginning and ending of the night. The actual times when observations are conducted at CHARA are closer to 12 degree twilight. To change this setting, go the "Edit" menu and select "Preferences". Then set "Twilight used as Night limit" to "Nautical (-12 deg)".
The Map tab shows the orientation of the selected baselines and the corresponding baseline lengths.
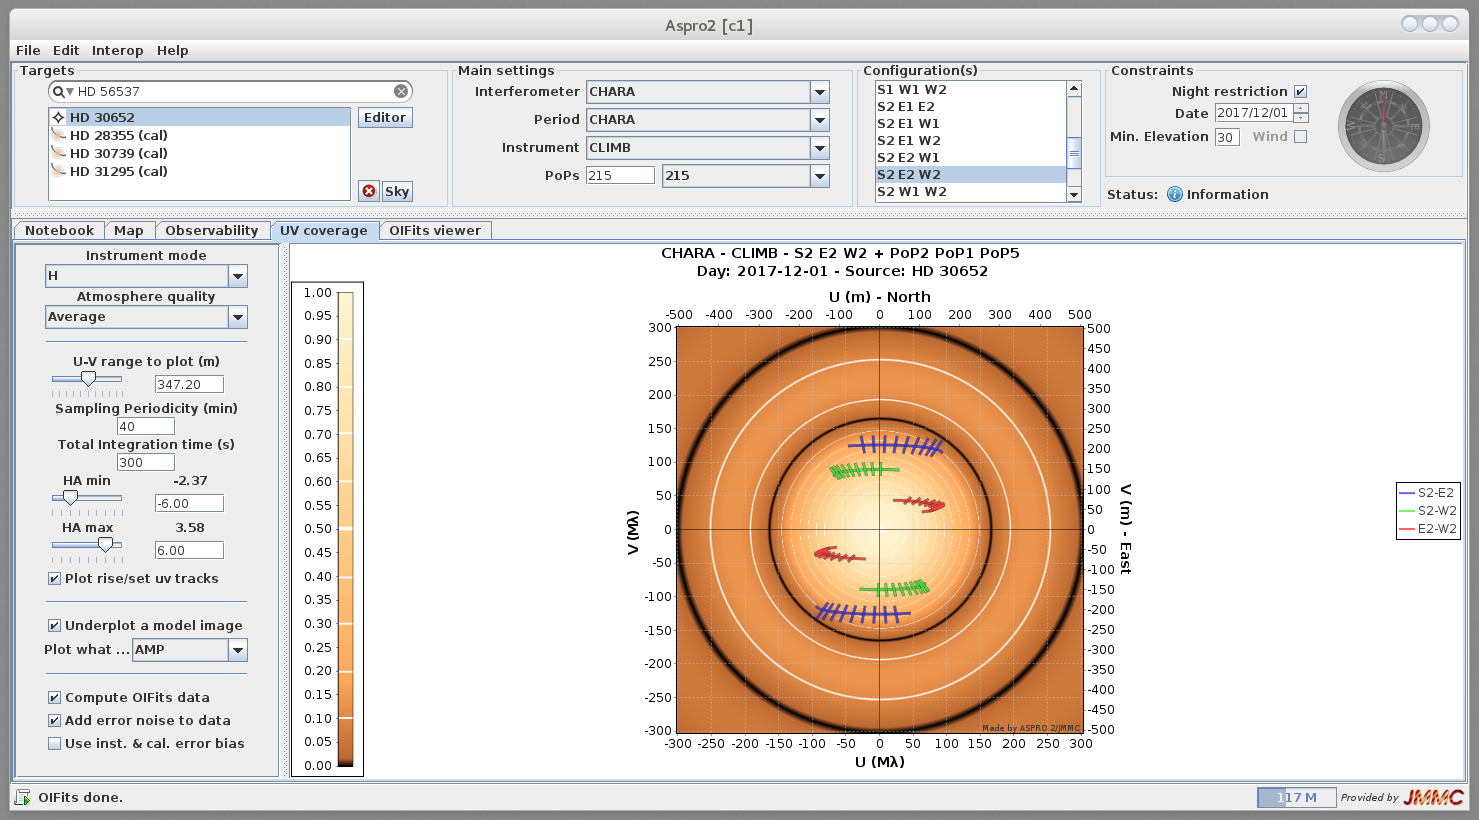
The UV coverage tab will show the uv coverage of the baselines projected onto the sky at selected time intervals. If a target model has been entered, then the Fourier Transform of the source distribution will be displayed, showing the spatial frequencies and orientations sampled by the projected baselines. In the example below, we entered a uniform disk of 1.53 mas. All three baselines sample the first lobe of the visibility curve (the dark black circles show the locations of the first and second nulls).
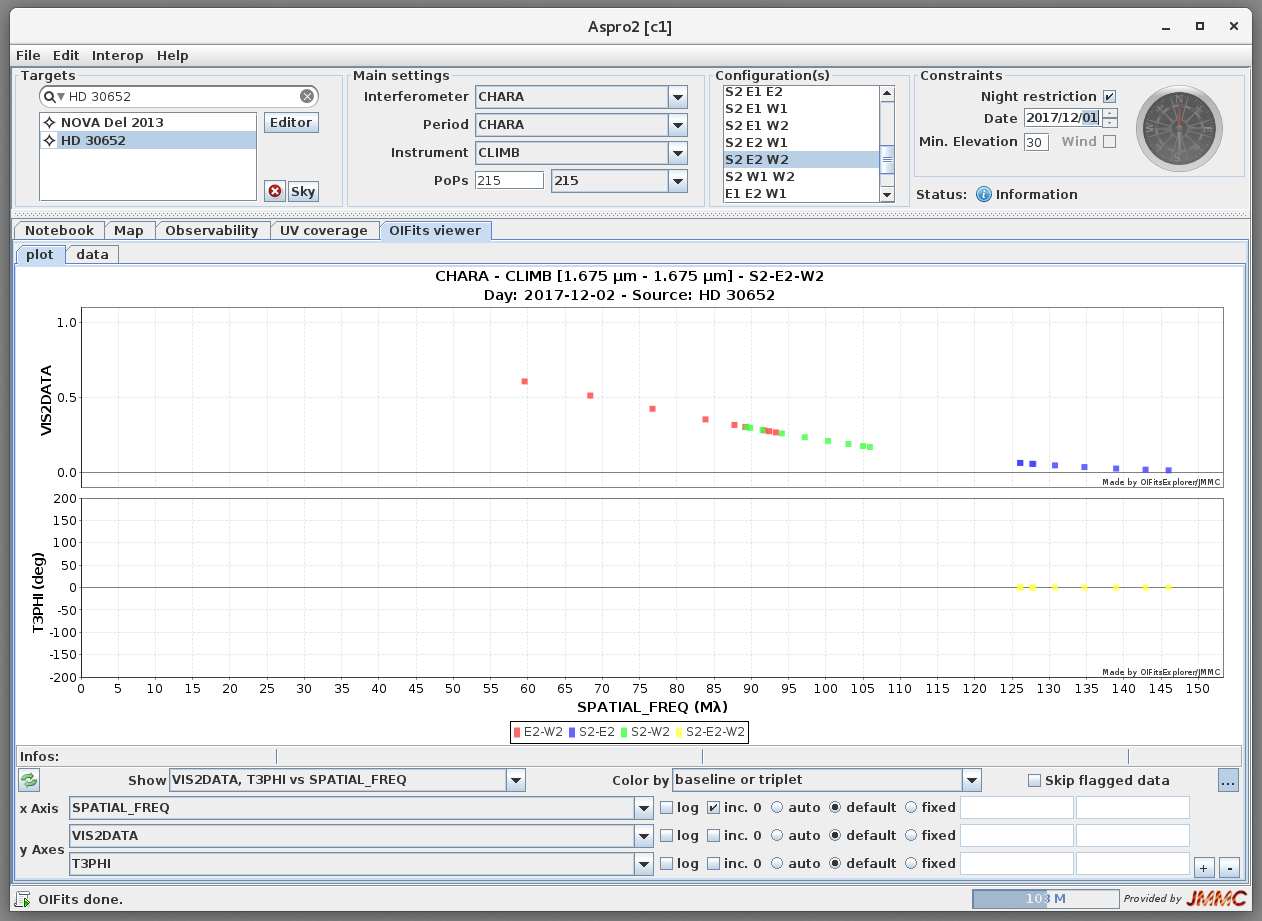
You can also generate a simulated interferometric data set by going to the OIFITS Viewer tab. As shown below, the simulated plots show model visibilities and closure phases for the selected beam combiner, baselines, and target model. The visibilities give information about the overall size, shape, and surface features of the object, while the closure phases provide information on asymmetries in the source distribution (see Basics of Interferometry page for more details). The plots below were generated by selecting color by "baseline or triplet" at the bottom of the page.
You can also upload a model image for the target (rather than using an analytic model) by going back to models tab in the target Editor and selecting the option for "User Model." Then you can upload a fits image of the target and generate simulated interferometric data for the image. For the fits image to be read into Aspro2, the spatial scale per pixel needs to be given in the fits image using the following keywords:
     CDELT1 = 0.02E-3 / Coord. incr. per pixel            rad / pixel (RA / column)
     CUNIT1 = 'arcsec' / Units along axis                 Optional axis units (rad, deg, arcmin, arcsec)

     CDELT2 = 0.02E-3 / Coord. incr. per pixel            rad / pixel (RA / column)
     CUNIT2 = 'arcsec' / Units along axis                 Optional axis units (rad, deg, arcmin, arcsec)
How to Plan CHARA Observations using CHARA_PLAN2
Download and install the reduceir software package.
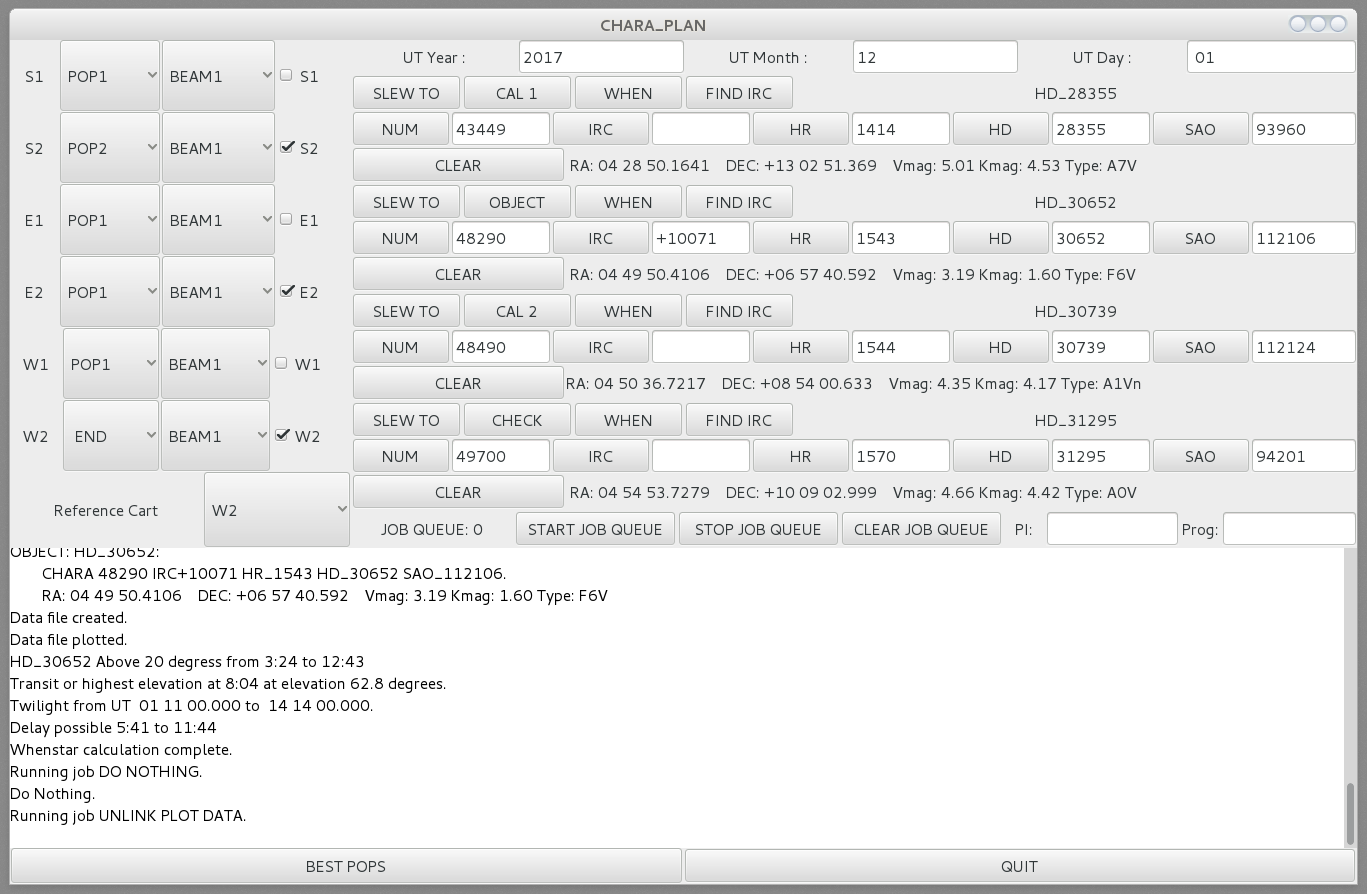
In a terminal window, type "chara_plan2" to start CHARA Plan. This will bring up the following interface:
Enter UT date of observations (year, month, day).
Enter the target and calibrator HD numbers into the relevant fields. Hit enter or click the "HD" button to load the HD number into chara_plan2.
Select the telescopes to be used by clicking the appropriate boxes.
From the pull down menu, select one of the active carts as the Reference Cart. This selection is arbitrary for planning purposes, but you can ask your support scientist for recommendations of which reference cart to use during observations. (Note: MIRC 6T observations usually use W2 as the reference cart.)
Select POPs for each telescope. If you don't know these beforehand, then use the default settings and follow the next few steps below to select appropriate values. Or you can click the "BEST POPS" button to find the configuration that gives the longest delay window. NOTE: Best POPS takes a very long time to run for 6 telescope configurations, so it could be faster to select these by trial-and-error by changing POPs for each telescope one at a time to see how it effects the observing window. For 6T configurations, W2 is almost always on POP5/END.
Unlike Aspro2, CHARA Plan gives the timing of the delay windows independently of the star's elevation. Therefore, you might need to change the POP settings from the "best values" to adjust the timing window depending on when you need to observe each target.
For a given Object or Calibrator, click the "When" button to retrieve the timing information. The text box on the main page will output the UT when the target is above 20 degrees elevation, the time of transit and maximum elevation, and the UT time when the target is in delay range (when fringes are possible for a given baseline and POP configuration). In the example above, the target will be available from UT 5:41 to 11:44 on S2-POP2, E2-POP1, W2-POP5/END.
Clicking the "When" button will also open a Gnuplot window. The x-axis goes from evening to morning twilight. The y-axis has two scales. The red line indicates the elevation of the target in degrees. In the example below, the red line indicates that the target will reach a maximum elevation 62.8 deg at UT 8:04. The other scale represents the delay range in meters. The horizontal green line shows the maximum delay range for each cart (44 meters of variable delay given by the length of the rails). The remaining colored lines show the available delay range for each telescope cart relative to the selected reference cart. For a cart to be in delay, the value needs to be between -44 to 44 meters (e.g., below the green line).
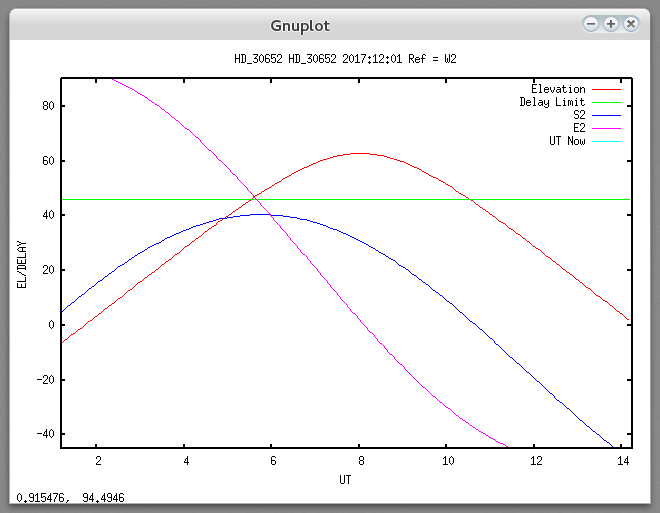
In the example above, the blue S2-W2 baseline will be within delay range from UT 01:11 - 13:56 and the magenta E2-W2 baseline will be within delay range from UT 5:41 - 11:44. However, the window where fringes can be found simultaneously on all three baselines occurs from UT 05:41 to 11:44. The spacing between any set of lines relative to each other and the reference cart cannot be greater than 44 meters or less than -44 meters. In general, if using more than one telescope, you'll want the separation between the delay tracks to be as small possible.
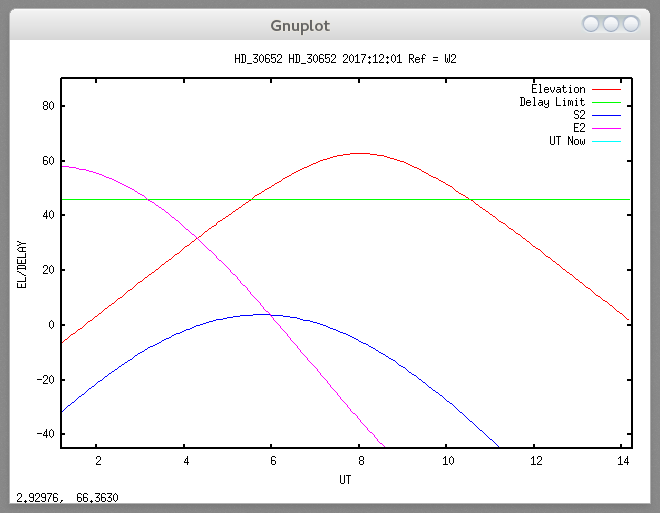
Changing the POPs will change the available delay window. For example, changing to S2-POP4, E2-POP3, W2-POP5/END will shift the delay window earlier in the night between UT 3:38 to 8:40:
In addition to finding POP settings that maximize the observing time for each target, it is best to observe targets when they are above 30-40 deg in elevation. This will provide improved seeing and avoid line-of sight obstruction from trees.